

Introduction
This is basically a quick tip, however I think it does need quite a lot of preamble to unpack all the background. If you can’t be bothered with all that, the TL; DR is “M3 thread stripped, couldn’t helicoil it, tapped it M4 instead” ;).
There are things we (or previous owners) did to RC cars back in the day that really weren’t good for them at the time, and definitely not good for them as a future collectible. Driving them to within an inch of their lives, bodging (or at least being “creative” with) repairs with non-standard parts, using far too much (or the wrong sort of) lubricant, then abandoning them to sit, sometimes for decades, where they’d be exposed to extremes of temperature.
Sometimes though, issues that wouldn’t be apparent until much later were caused by following guidance from importers and retailers – and even Tamiya themselves.
To this day, UK and US importers and retailers refer to the cross headed screwdrivers required to put any Tamiya kit together as “Phillips head”*. This is simply wrong, the screws are JIS (Japanese Industry Standard). They’ll go in with Phillips screwdrivers, and most of the time they’ll even come out again. But you can bet when it’s important, the subtly different profile will have caused damage and the head will strip.
* Even Tamiya’s own JIS point screwdrivers.
In early kits (up to about 1985), where fasteners meet metal parts, Tamiya told us to use threadlock in the build manuals - and even supplied a tube of the stuff. It was tough stuff even back then, but c.40 years later can be seemingly indestructible.
The worst culprit is in my experience is the gearbox frames on the 58036 Audi Quattro and 58037 Opel Ascona (also used on the Wild Willy – both M38 SWB and LWB versions – and the Willy’s Wheeler), where screws are permanently bonded into the cross braces, the screw heads usually stripped – and every needs to be drilled out and replaced.
A term that you might have heard, especially if you own any older “pot metal”* toys - or a vintage Wild Wild Willy/Wheeler etc is “zinkpest”, where impurities in cast zinc alloy items cause them to decay and fragment over time.
I’m not aware of this being a problem with Tamiya’s SRBs, but the use of small, fine pitch threads in what can be quite a granular material does cause problems. Gearbox fastener issues can often be “fixed” by using slightly longer screws, but when a thread strips out of one of the front arms there’s no good workaround.
* or “Mazak”, aka “Zamak” (from the German Zink (zinc), Aluminium, Magnesium und Kupfer (copper)).
Thread Inserts
When it comes to thread insert systems “Helicoil” is so well known it’s become the generic term for the process – but other brands that are just as effective are available.
In the UK, Chronos (www.chronos.ltd.uk) supply their own “Thread Repairing Kit” in various thread sizes, however I have something of a preference for Voelkel “V-Coil” kits* due to them having a slightly nicer plastic case with only one sliding catch instead of two clips to be undone.
In both cases, everything you need apart from a drill and thread cutting tap holder is supplied.
* … and especially by mail order from SEF (southessexfasteners.com) due to their customer service – next day delivery, and even calling me to check I’d meant to buy a kit in one size and extra inserts in another.


The process (not shown here) starts by carefully clear out any remaining thread and make the hole big enough to accommodate the thread cutting tap.
Next, the thread cutting tap in a suitable holder - and suitably lubricated (I’d suggest 3-in-One oil as it has a multitude of uses and will happily sit on a shelf for decades) – needs to be driven gently through. Making sure it’s straight and going one turn forward, half a turn back to clear any chips and stop it jamming.
The thread insert is then screwed in*, and the tang at the end broken off with the punch.
* it’s well worth cleaning the threads and using a dab of Araldite (2-part epoxy) or, to a lesser extent, superglue (cyanoacrylate) to make sure it can’t unscrew.
Note that thread inserts need to be the right size (M3 x 0.5mm pitch) and the right length – as indicated by a “D” (for depth?) number, rather than a length in mm.
This is a multiple of the thread size – for example for M3, 0.5mm pitch thread, an “M3 x 0.5 1D” insert is 3mm long (or deep), 1.5D = 4.5mm, 2D = 6mm, 2.5D = 7.5mm, 3D = 9mm.
For M4, the lengths would be 4, 6, 8, 10 and 12mm respectively, and for M5, 5, 7.5, 10, 12.5, 15(mm), and so on.
Sometimes though, using thread inserts is not an option.
Cutting New, Larger Threads
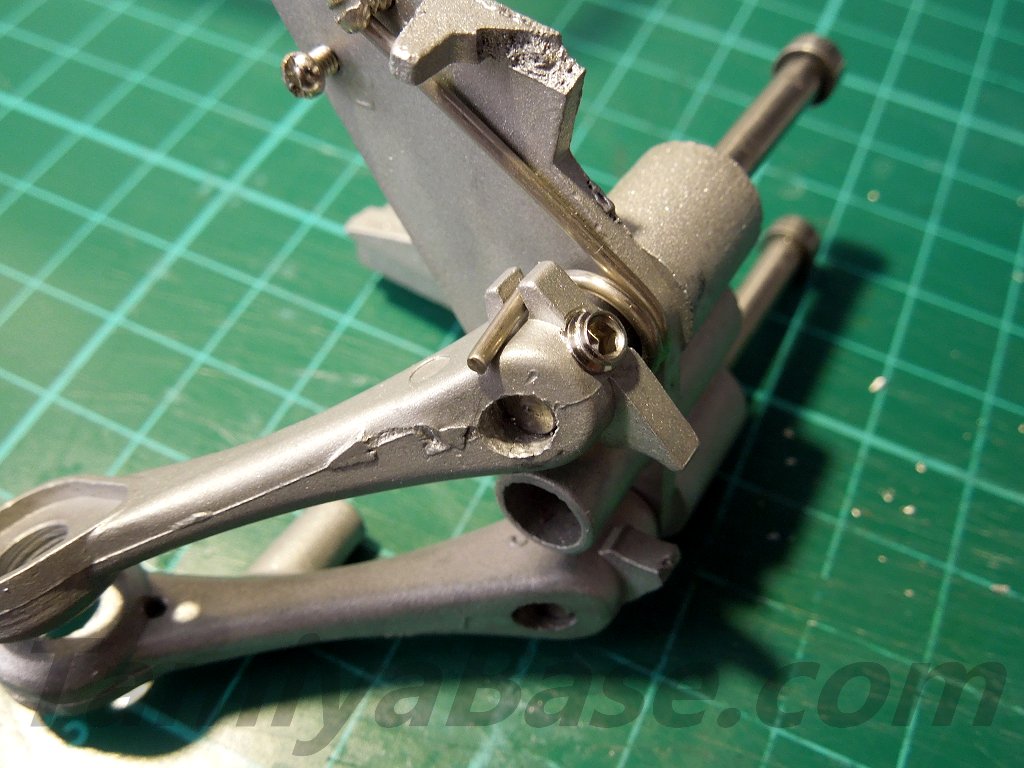
The worked example here is a “mk.1” (or let’s say “early” as I know larbut doesn’t like such absolutism in this case ;) ) SRB chassis.
Where the thread had been stripped on the right upper arm, a “creative” previous owner had jammed in a non-standard screw (I think from a Meccano kit – brass, round head slotted in 5/32” BSW), which had partially cut a new thread.
As the hole was already way bigger than the 3.1mm required to cut a thread for an M3 insert, the best option* was to use an M4 grub screw instead (the existing hole being too big for the next size up – M3.5**).
* At the time I did it, anyway. This is another article that’s been sitting unfinished on my hard drive for some time, I think now I might try fixing an insert in with Araldite “Steel” or similar before reaching for the bigger drill bits.
** M3.5 is also not used anywhere else on any Tamiya vehicle, so if I’d bought any taps in that size they would likely have been no use to me afterwards.
A 3mm drill bit did nothing, 3.2mm took off the tiniest bit at the very bottom of the hole, and 3.5mm just about touched the sides in most places.
Thread cutting taps come in three varieties per size - not counting whether they’re “straight”, “spiral”, the number of “flutes”, or the material they’re made from, none of which really matter for the soft, pot metal being cut here.
Typically, they’re referred to as “taper”, “second" and “plug” (or “bottoming”). “Taper” taps cut a shallow, smaller than final size thread starting with almost no material removal, a “second" tap is also tapered but to final thread size and therefore takes off more material, and a “plug” (or “bottoming”) tap barely has any taper, making it more useful for blind or deeper holes.
For this “fix”, I started with a “2nd" M4 tap before finishing with a “plug” tap.
 and too long M4 grubscrew (zinc plated)")


 up of the new threads, and I also bought some shorter M4 grubscrews.")

Conclusion
These are techniques that have wider uses than fixing SRB suspension arms – for instance on styrene scratch builds I tend to include thread inserts as a matter of course rather than risk having the plastic threads strip later.
Despite the quantity of text here, these are quite simple operations – providing you have the right tools – and it must be better than bodging it. Whether a thread insert or going up a thread size or two is better replacing a part is a different question, I think that depends on if you’re building a fresh out of the box looking shelf queen, or tidying up a runner to include some of its historical scars.
When it comes to buying “helicoil” type kits, M3 is probably the most useful size for Tamiya cars, but M2 and M4 also have their place.
You don’t have to buy a big tap & die set, and a cheap set is a false economy. It’s better to buy the bits you do need, piecemeal, in higher quality.
________________________
Written by TB member Jonny Retro