Keyword

TOPIC:

Carbon fibre racer in minature, scratch build! 11 years 2 months ago #18199

Just looked up "14th commandment", but there's no mention of '69 Camaros...
Mysterious sounds like a cool thing to be, it's got a bit of a Dr Who or alien thing about it, mind-probing would be a really useful trick to learn, not quite so excited about badword-probing though, least not without some form of stick

Please Log in to join the conversation.

Carbon fibre racer in minature, scratch build! 11 years 2 months ago #18200

Just looked up "14th commandment", but there's no mention of '69 Camaros...
Mysterious sounds like a cool thing to be, it's got a bit of a Dr Who or alien thing about it, mind-probing would be a really useful trick to learn, not quite so excited about badword-probing though, least not without some form of stick


It might not be the 14th, I get a bit confused after the 11th ("don't get caught") :D

I think 12 is "Don't badword the wrong people off" (although that might be the 0th), I think 13 is "If you've known a guy more that 24 hours, don't hit on his sister", 15 is "Don't wear brown shoes with black trousers", and so on ;)

Please Log in to join the conversation.

Carbon fibre racer in minature, scratch build! 11 years 2 months ago #18202

Hi Eddrick
This is a scratch build of note!!! you should be very proud of your design and end product.
I can recommend using a thin clear CA glue on the frayed carbon fiber before and after sanding along the edges. The CA will penetrate the fibers and leave you with a nice solid edge.
Fantastic job!!
Marius

Please Log in to join the conversation.

Carbon fibre racer in minature, scratch build! 11 years 2 months ago #18204

Cheers Marius, I'll have to remember the CA for next time. The "glue getting sucked up the fibres" effect was what I was seeking to achieve with the epoxy, & yes, CA being thinner should work better.

Oh & yes, I am proud, can't you tell? Makes me smile every time I pick it up!

Please Log in to join the conversation.

Carbon fibre racer in minature, scratch build! 11 years 2 months ago #18211

How awesome is this one. You're really in a league of your own. :y:

Please Log in to join the conversation.

Carbon fibre racer in minature, scratch build! 11 years 2 months ago #18212

"In a world of my own" has often been said, "hatstand" is another term recently used.

Interesting thought train that led from "pan car" to "1/10 pan car" to "Hmm RC'd Scalextric car" to "Scratch build micro pan car" to the result we have here. I was digging out the titanium & searching for cheap carbon fibre sheet before I'd even settled on what exactly it was I was having a good idea about!
I mean, it's not like I'm looking for something to do through boredom, my brain is easily distracted & comes up with these "great ideas" before my body has a chance to do anything about the last one.

It's been a handy exercise to see what the current lathe & mill are capable of, & to be honest, they've really surprised me. Very pleased with the result!

Please Log in to join the conversation.

Carbon fibre racer in minature, scratch build! 11 years 2 months ago #18234

how much wold you want for one?, no electrics i have some, i have lipos that might fit, might need a motor

for different tires/wheels, you should get losi mini/micro stuff, it should fit

Please Log in to join the conversation.

Carbon fibre racer in minature, scratch build! 11 years 2 months ago #18259

Ha Zephrin, I've been asked that several times already, & unfortunately the answer would be "You wouldn't want to pay the price that reflects the effort to produce it".
Of course, I can send you drawings if you fancy having a go yourself.

As it stands, it's unlikely any "standard" wheels/tyres etc would fit it, I didn't base them on anything, just made it up as I went.... Closest would probably be Tamtech, or maybe Xmods (Tyres are 25o/d x 20i/d x 9F 11R).
Bearings/shafts diameters are same size as Mini-Z (3mm), don't know about shaft lengths/wheel offsets.
Motor frame size seems like a standard thing though (Mabuchi/Kysan FK180SH-3240), 1/24 Tamtech & slot cars use similar

Please Log in to join the conversation.

Carbon fibre racer in minature, scratch build! 11 years 2 months ago #18260

Oh, forgot to say, the only way you'd want to go with a replacement motor would be smaller or less powerful - the one that's fitted is far too powerful to be usable/fun - it's a bog standard motor, but even with it geared too high the power delivery is just bonkers - Across my front room I'd say it would outdrag any of my 1/10 stuff, with it throttled back to actually get traction (ie no more than 1/8 throttle, any more just causes manic wheelspin). It goes like a slot car

Please Log in to join the conversation.

Carbon fibre racer in minature, scratch build! 11 years 2 months ago #18283

Ok, I've got a few more pics to post, done some bodyshell bits....

I started with this to measure to base the rest of the car on.
Note the fully chromed grille, mainly because it was very tedious & fiddly work getting the chrome off from where it's not supposed to be chromed, ready for painting where it's supposed to be painted


1st job was to double-check the body would still fit the completed rolling chassis.
Then, when I was happy with how it "sat" & was sure nothing was fouling where it shouldn't be (eg, had to trim the front arches a bit to clear the front wheels when steering) I glued in some short lengths of "Plastruct" styrene tubing (These engage with the modified M2 cap screws in the mounts on the chassis. Once the styrene cement had hardened, I reinforced them with epoxy


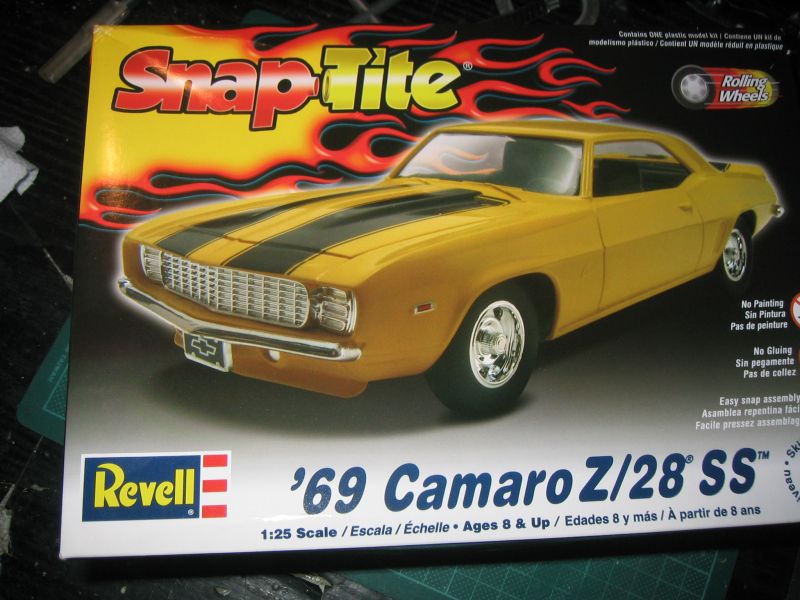
There are no side windows on this kit & the plan was to paint windows black to hide the gubbins underneath the body (No room for an interior & driver!).
I mounted the window moulding into the shell & chopped up some card to fit, to use as a template, then used this template to cut some side "windows" from Plasticard & glued them to the rest of it.
The grreen pen marks were to show me "what's on show", to make trimming off the excess easier.


Popped a 6mm hole in the body roof to pass the aerial, then keyed up & degreased the various bits ready for painting.
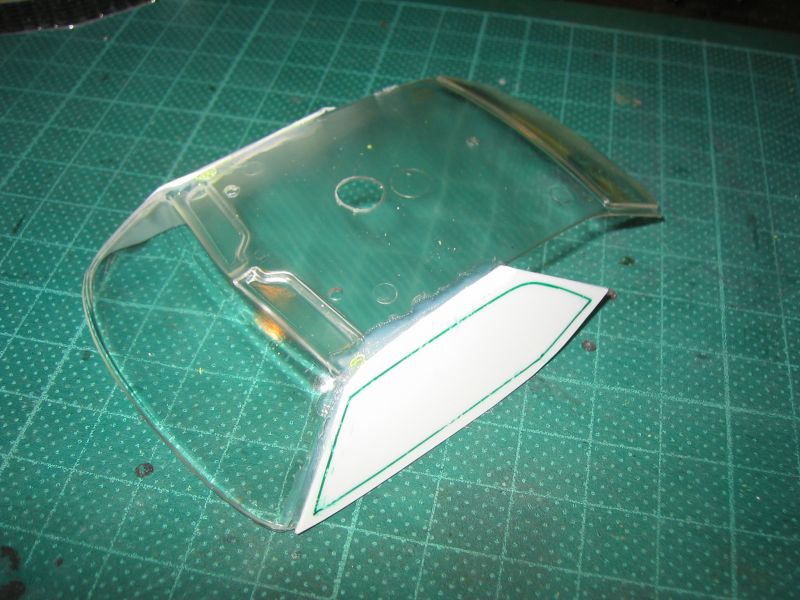
Windows got some automotive Holts satin black (Left over from the repro XR311 bits I made), which gave some "interesting" results on the clear styrene, but not on the white stuff (Should've anticipated that....)


Thought I'd laquer it to make the effect go away, but it didn't...
So, once it was dry & hard enough, I flatted it back & redid it with gloss black enamel model paint, which seems to have gone a lot better!


Whilst the body paint was (Is still) drying, I turned my attention to the grille.
As I said, it's chromed all over, but the 1:1 is painted, with chrome only on the surrounds to the various bits (The headlamps live behind 3x "slats" in the grille, each with its own chrome surround). Using a 10A scalpel blade with a busted tip, I scraped off the chrome from all the bits that were going to be painted, including the grille itself. I'm fairly sure I may be suffering with some form of repetitive strain injury now! "Trigger finger", shaky hands & dodgy eyesight really didn't help either!
Sort of forgot to take a pic of the post-scraped grille until after I'd daubed some matt black on it, but you get the idea


Once the black had dried enough for handling, the "in between" bits needed to be painted with the body colour, so I did that.
The body colour was going to be a 70's-style light metallic green, but I couldn't find one in Downham AT's (Motor factor/hardware shop) & I haven't got the fuel to go to Lynn for toy car paint, so I settled for something a bit darker/greener.

Now, to apply automotive spray to something I'm struggling to pick up with my fingers....
Yeah right! Opted for the "Spray it in a lid & brush it on" option, which was still really difficult, even with my "3-hair brush (As I call it), particularly between the headlamp slats (I'll bet they're less than 1mm wide...). Once that was dry, I topped it with model enamel laquer (I feared auto laquer might go for the remaining fake chrome where I would probably manage to splat it in the wrong places)
Anyway, grille's done


Main body is painted & laquered, I'm just waiting for it to dry enough to see if it needs more on it

Please Log in to join the conversation.

Moderators: caprinutstingray-63AndyAus
Time to create page: 0.230 seconds
Cookies are required to make this site work. If you continue to use this site you permit us to use cookies.