Keyword

TOPIC:

Vintage Manta Ray customisation quest 11 years 9 months ago #11349

  • Edou
  • Edou's Avatar Topic Author
  • Offline
  • Hopping Mad
  • Hopping Mad
  • Posts: 6135
  • Likes received: 483

have been playing with the same idea with the brass tubing to get rid of some play in joints.
beter than replacing worn out c hubs & steering parts. :y:
be carefull with the e-tool had a ring flying away like a rocket as it snapped out and nearly got it in the eye. :whistle:

btw. got a TF on its way and an original T alu motormount :P
need to stock up on shims, where did you get yours?

I could send you some of this stuff if you like. I used less than 3% so far... ;)
Have a feeling they could also come in handy as spacers for aligning shocks to suspension arms for example.
Although for that purpose one could better use it's aluminium twin. Phil's Hobby Shop btw.

Got the shims at Banzai . :y:

Nice score again too! :woohoo:

And one of the jumping rings touched my reading glasses... :S

Overall though I think fitting parts like your brass tubes & shims is a Good Thing - if you get a light sliding fit there shouldn't be room for bits of smeg to get in & cause wear :)

Good point - makes me think I should rather do a 0.1mm shim on each side than 0.2mm on one side.
That way it will act as a sort of a double seal.

:y:

Please Log in to join the conversation.

Last edit: by Edou.

Vintage Manta Ray customisation quest 11 years 9 months ago #11435

  • Edou
  • Edou's Avatar Topic Author
  • Offline
  • Hopping Mad
  • Hopping Mad
  • Posts: 6135
  • Likes received: 483
Jonny's post made me think and have another look at the shimming...
I decided to add 0.1mm - this one on the other side of the hub so the hole and tubing is shielded on both.
The process of trial and error to find the best thickness can be avoided from now on with this new tool :


It told me in an instant the same setup (0.3mm total) was appropriate for the other suspension arm.
Somehow I managed to slightly impress myself with what I had put together. :huh:
It turned out very solid, virtually tolerance free yet still moving smoothly. :)

But now that I'm working on this level of precision, I can't ignore what my helper tool is telling me.
The front knuckle can move about 0.35mm up and down inside the C-hub...
Which feels like a lightyear really. So I'll have to go find some 5mm shims for that.
Strange thing is, the cause seems to be that the king pins don't go in far enough.
Like there isn't enough thread inside the knuckle. A 0.3mm (thickness) shim should solve this though.


Besides the 4mm hole for the suspension shaft, the other dimensions of a CC-01 hub might also be a bit different.
About 0.3mm less width and height from what I can conclude here... but a caliper should give confirmation on that.
Makes me wonder about the caster angle this part gives the car compared to a DF-01.
I couldn't really find any data on that on the web.

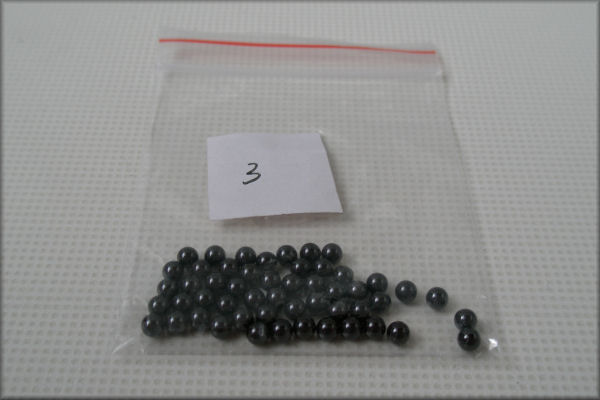
While I have the suspension arms off, I'm gonna take the opportunity to replace the steel diff balls with ceramic :


Then I hope the aluminium rear knuckles will arrive shortly...
Attachments:

Please Log in to join the conversation.

Last edit: by Edou.

Vintage Manta Ray customisation quest 11 years 9 months ago #11454

TF is in the mail :woohoo: got me a gauge too, from HK.

So your DFs no longer have balls of steel, eh! B)

Please Log in to join the conversation.

Vintage Manta Ray customisation quest 11 years 9 months ago #11465

  • Edou
  • Edou's Avatar Topic Author
  • Offline
  • Hopping Mad
  • Hopping Mad
  • Posts: 6135
  • Likes received: 483
It's balls are extremely hard now. :pinch:
Lovin' the new tools - they make the build much smoother...

Wb, let's see that TF as soon as it arrives! B)

I've been having a look around for a (future) replacement of the shocks.
At first I was taken by the Junfacs... until I saw these :


I may have to sell some organs for those but check out the double action spring! :woohoo:
The shorter (softer) one is for smaller bumps and will work together with the long one when necessary.
Also like the beefy 3.5mm suspension shafts...
These dampers will fit nice with the Pro-Line wing and wheels.

Only thing is, you could buy another car for what they cost. :whistle:
Attachments:

Please Log in to join the conversation.

Vintage Manta Ray customisation quest 11 years 9 months ago #11468

The TF arrived, well that is the box, inside was a TL01 with a audi body :ohmy:
The Seller unintentionaly switched the adresses :(
Already in contact, I hope the other recipient is cooperative.

Please Log in to join the conversation.

Last edit: by waterbok.

Vintage Manta Ray customisation quest 11 years 9 months ago #11469

  • Edou
  • Edou's Avatar Topic Author
  • Offline
  • Hopping Mad
  • Hopping Mad
  • Posts: 6135
  • Likes received: 483

Hope that gets sorted quickly... :dry:
Attachments:

Please Log in to join the conversation.

Last edit: by Edou.

Vintage Manta Ray customisation quest 11 years 9 months ago #11471

The TF arrived, well that is the box, inside was a TL01 with a audi body :ohmy:
The Seller unintentionaly switched the adresses :(
Already in contact, I hope the other recipient is cooperative.


Ouch! :pinch:

Please Log in to join the conversation.

Vintage Manta Ray customisation quest 11 years 9 months ago #11740

  • Edou
  • Edou's Avatar Topic Author
  • Offline
  • Hopping Mad
  • Hopping Mad
  • Posts: 6135
  • Likes received: 483
Yes! The alloy rear knuckles have finally arrived! :woohoo:


And hopefully another camera will get here soon so I can take some pics of my own again... :)
Attachments:

Please Log in to join the conversation.

Last edit: by Edou.

Vintage Manta Ray customisation quest 11 years 8 months ago #12265

  • Edou
  • Edou's Avatar Topic Author
  • Offline
  • Hopping Mad
  • Hopping Mad
  • Posts: 6135
  • Likes received: 483
Okay guys, I know I said this bathtub DF-01 was done but it wouldn't be a quest without a little change of direction.
But now I can say it's actually finished 'cause it's been sent to another member of the Tamiya fan club.
This is how it was - Manta Ray shell, home made camber rods and the not so great Racing Punk hexes :


Now fitted with cool Terra Conqueror (Conquerer for the search engines) turnbuckles and some nice black alloy hexes :


And a new body shell - that of the Top Force, modified for the bathtub chassis. B)
I started a separate thread about the paint details (will do so for all the shells) and posted some outside pics here .
Now the final "clean" shoot :


Ow, I like that last one. Just a touch of gunmetal... :woohoo:

I've really spent days on that Manta Ray body so far but guess what colour it's gonna get next?
Getting kind of inspired to have a good go at the other shells...
Hope summer isn't over yet.

Please Log in to join the conversation.

Last edit: by Edou.

Vintage Manta Ray customisation quest 11 years 8 months ago #12267

  • Edou
  • Edou's Avatar Topic Author
  • Offline
  • Hopping Mad
  • Hopping Mad
  • Posts: 6135
  • Likes received: 483
Oh my, I haven't shown this here yet. Es muy coolio :


An aluminium part from the Avante (!) that will replace the plastic J12 mount from the Top Force :


Cudos to waterbok for the tip. And many thanks for sending me one. :cheer:

Also hoping to see some other bits he recommended - rosette washers for the undercowl and rear shock tower. B)
Together with an nice array of shims for the ultimate details on the FRP chassis.

:)

Please Log in to join the conversation.

Last edit: by Edou.
Moderators: caprinutstingray-63AndyAus
Time to create page: 0.280 seconds
Cookies are required to make this site work. If you continue to use this site you permit us to use cookies.