Keyword

TOPIC:

Truck Project 3 years 4 days ago #66430

I started by placing the crane assembly in its intended location. As usual some modifications were necessary... The front stabilization legs were touching the front mudguards (they are off center) and the front one on the right side did not have enough space. If I position the crane so that the foot doesn't touch the fender, it's the crane support that doesn't have enough space because of the transmission.


So no choice... we have to move the transmission. So I took it apart. I'll reposition it later once everything is in place.
I was able to measure and make the holes for the crane mount.
While measuring the steering lever for the second front axle was in the way, so a 3mm repositioning was necessary.


Proud owner of the Bruiser Family
Attachments:
The following user(s) Liked this: stingray-63, jord001, mirrorman

Please Log in to join the conversation.

Truck Project 3 years 4 days ago #66431

The crane is now fixed at its final location.


It remains to install the back part.
Here everything becomes a little more complicated... This part being much longer than expected I had to shorten the chassis part. Otherwise it is during the tilting of the bucket that it comes to touch this part.


The parts of the frame measured and ready to be shortened


Proud owner of the Bruiser Family
Attachments:
The following user(s) Liked this: stingray-63, jord001

Please Log in to join the conversation.

Truck Project 3 years 4 days ago #66432

It goes without saying that the back part that I had already installed and adjusted will no longer find its place. In short, it will be an extra piece of collateral damage ha ha ha. At least I will try to install the lights.

Once this part was adjusted to the chassis I had to cut the two rear mudguards because they were touching this part.


And here it is... 
I also adjusted the supports for the mudguards by drilling holes directly in the supports.
The fenders will be filed down for a nicer look when finished
Proud owner of the Bruiser Family
Attachments:
The following user(s) Liked this: stingray-63, 1972 LeMansGT Jim, jord001

Please Log in to join the conversation.

Truck Project 3 years 4 days ago #66433

Once this part is in place, it's time to install the transmission again. Good thing I haven't ordered the driveshafts yet because with all those adjustments I made the lengths would be all wrong.
I positioned the transmission so that it doesn't touch the crane and the gear selection knob remains accessible.


The plastic plate of the Tamiya kit also had to be cut to make room for the motor.


Now that these parts have found their place, I still have to install the rear lights. I have to think about how to do it.
I also have to install the hydraulic valve block, the pump and all the hydraulic lines. 

More to follow soon.

Thanks for looking

Manotas
Proud owner of the Bruiser Family
Attachments:
The following user(s) Liked this: silvertriple, jord001, mirrorman

Please Log in to join the conversation.

Truck Project 3 years 4 days ago #66436

 topissime manu.
The following user(s) Liked this: jord001

Please Log in to join the conversation.

Truck Project 3 years 4 days ago #66446

What are your radio plans for this project?  I'm guessing the crane alone needs at least 6 channels, maybe even 8.  You probably need 3 - 5 for driving the truck depending on whether or not you are remotely locking the differentials.  Then another couple for dumping the bed.  I love digging deep into these kind of details.  Thanks for all the information in this topic.
The following user(s) Liked this: jord001

Please Log in to join the conversation.

Truck Project 3 years 3 days ago #66459

Awesome!!

I can see $$$$$$$ signs when I see those pictures 
The following user(s) Liked this: silvertriple, jord001

Please Log in to join the conversation.

Truck Project 2 years 11 months ago #66523

What are your radio plans for this project?  I'm guessing the crane alone needs at least 6 channels, maybe even 8.  You probably need 3 - 5 for driving the truck depending on whether or not you are remotely locking the differentials.  Then another couple for dumping the bed.  I love digging deep into these kind of details.  Thanks for all the information in this topic.


This is indeed a question I asked myself at the beginning of this ambitious project. Nevertheless, as many points were not available or not clear at the beginning, I navigated a bit blindly.So I made some estimations about the number of channels needed for the dump bed as well as for the crane.
The number of channels needed for the chassis and the driving was clear from the start.The sound effects and lighting were also clear since I'm going to use the Tamiya MFC unit.

After reading through different forums and websites I saw that there are other options with the same features. Two things confirmed my choice of the MFC. The first one is that this system doesn't require additional channels for sound and conventional lights and the second one is that I know how this system works.
The disadvantage is that the number of lights is relatively limited compared to other systems, but there are modules that plug into the MFC unit to have more LED's.To answer your question, here is the number of channels required.

For the crane:
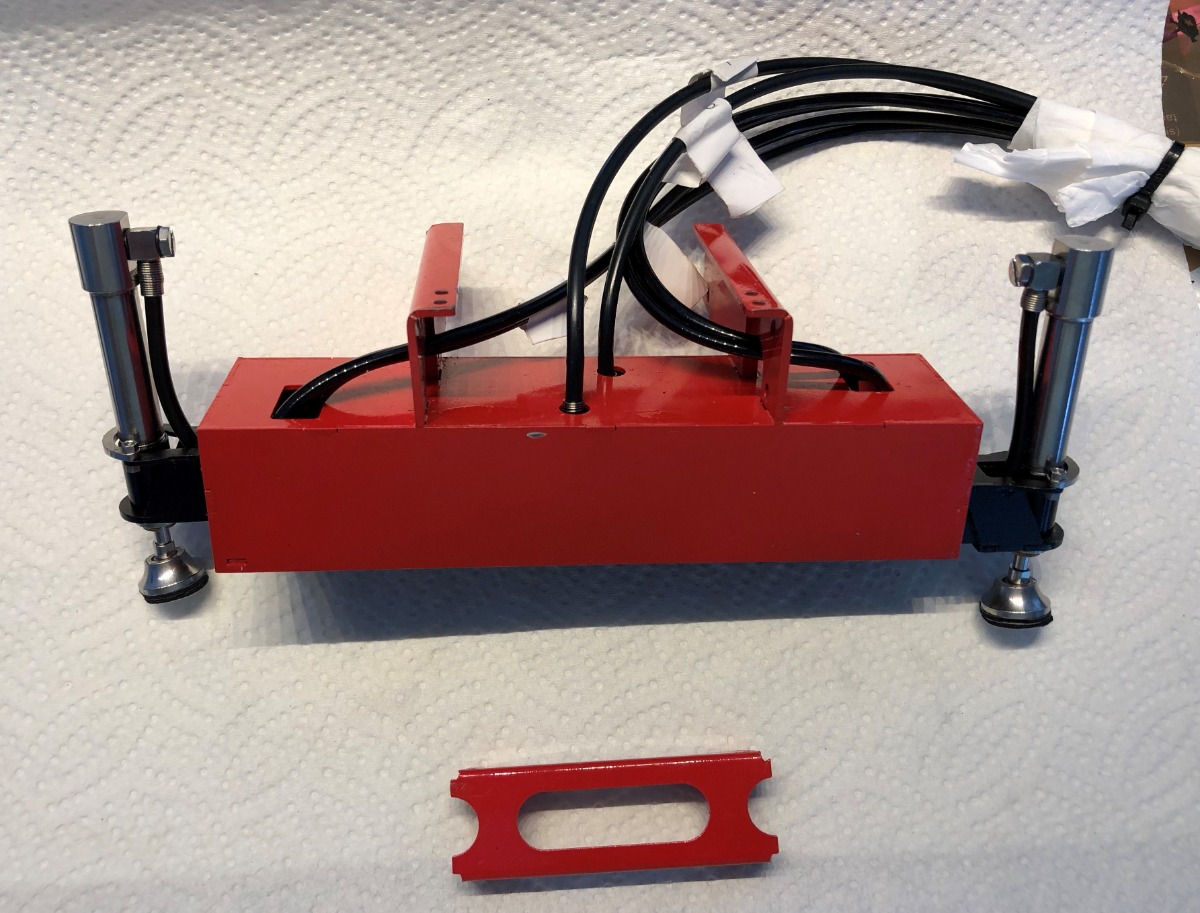
For the control of the hydraulic block: 5 channels
For the crane turning function: 1 channel

For the dump bed:For the control of the hydraulic block: 2 channels
Hydraulic pump (I will use one pump for the hydraulic circuit): 1 channel

Chassis:
Accelerate/reverse: 1 channel
Right/left steering: 1 channel
Gear change: 1 channel
Steering last axle: 1 channel
Differential lock: 1 channel
Transfer case lock: 1 channel

In total this brings us to 15 channels for the main functions.
By the way, I'm still in the stone age when it comes to remote controls, since I rarely drive my cars. For the old ones I have vintage remote controls with quartz of max 4 channels.

On the other hand I have a classic 4 channel remote control in 2,4 Ghz for my trucks (Globe liner and Grand Hauler).I've done a lot of research on the net, and spent hours of reading to find a remote control with the required number of channels. I found the Scalerart Commander which is perfect for this kind of vehicle but way out of my budget.

I chose a Frsky Horus X10 because it has at least 16 channels, expandable to 32 channels with the S-Bus. ( Frsky Horus X10  ). I ordered two receivers of 8 channels each. This is already a good start 16 channels and if it turns out to be insufficient I can always add an S-Bus decoder to double the number of channels.

I found a used X10 that I bought and found out that I need to do a big upgrade on my part as far as programming the transmitters.I downloaded the user manual (about 300 pages) as well as a lot of documentation for the upgrades. Currently my X10 has the OPEN TX software which is supposedly compatible with more receivers, but with my current knowledge I am completely lost in the menus. Not having found a detailed manual on this software, I will load the latest Frsky software to start on a good basis with a detailed manual. I haven't started learning yet but it won't take long.
Proud owner of the Bruiser Family
The following user(s) Liked this: stingray-63, silvertriple, jord001

Please Log in to join the conversation.

Last edit: by Manotas.

Truck Project 2 years 11 months ago #66524

OMG! 16 channels?  You need another pair of arms... Ask to chiva to help you... 😂
The following user(s) Liked this: silvertriple, jord001

Please Log in to join the conversation.

Truck Project 2 years 11 months ago #66525

OMG! 16 channels?  You need another pair of arms... Ask to chiva to help you... 😂

Ha ha ha yeah right...
The transmitter has a mix function that allows you to have less hands to perform a few functions at the same time..
But at this point I have no idea how to program this ha ha ha ha
Proud owner of the Bruiser Family
The following user(s) Liked this: jord001

Please Log in to join the conversation.

Moderators: caprinutstingray-63AndyAus
Time to create page: 0.202 seconds