Keyword

TOPIC:

Vintage Manta Ray customisation quest 12 years 5 months ago #4128

  • Edou
  • Edou's Avatar Topic Author
  • Offline
  • Hopping Mad
  • Hopping Mad
  • Posts: 6135
  • Likes received: 483
And a side view :

Please Log in to join the conversation.

Vintage Manta Ray customisation quest 12 years 5 months ago #4143

  • Edou
  • Edou's Avatar Topic Author
  • Offline
  • Hopping Mad
  • Hopping Mad
  • Posts: 6135
  • Likes received: 483
Now I'll make this more of a build thread again - with the details of front gearbox assembly.
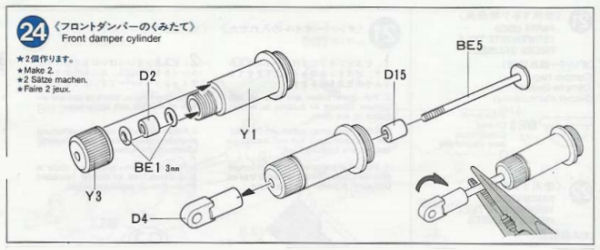
I started out with putting together new Top Force damper housings with the original (cleaned) parts from the Manta Ray :


Also replaced the O rings (BE1) and used #600 oil. In vintage terms that is hard but nowadays it is considered medium.


Used a trick I saw in Lars' 959 topic - a little oil on the threads of the damper shaft to keep them from damaging the seal.


Most guys leave the dampers open overnight to let the air out.
I usually lack the patience and keep the shock directly under a light, while tapping it until all the bubbles are gone.
Shining light into it will expose any air present... :side:

A couple of spare gear diffs available so I can take a pick :


The inner parts of the gearbox. Notice the hollow carbon (idler) gear shaft right from the middle. B)


Same stuff, now assembled :


In the box :


Next the shock tower. Used some alloy TRF parts for connecting the camber turnbuckles :


Consisting of a step screw and ball nut :


Fitted on the gearbox :


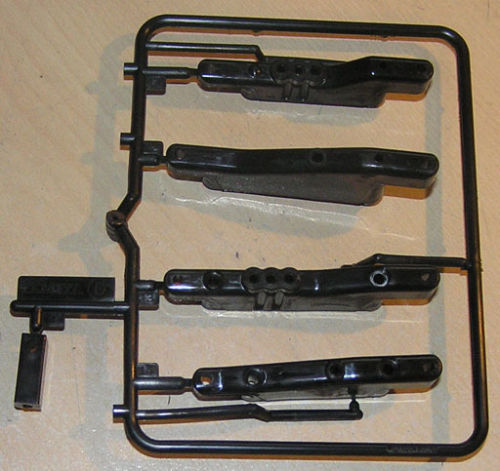
The rest of the front parts... except for the gearbox joints and some shock mount items. :whistle:


Hubs and uprights finished :


And all done a few steps later :


Shocks are mounted with a step screw on top and a flanged tube and screw on the bottom :


I'll need to get a flangy bit that's slightly longer though but it works for now.
Although the car can be run, it's quite impossible to stop planning on other upgrades.
Think the thread may go on just a little bit longer...
Attachments:

Please Log in to join the conversation.

Last edit: by Edou.

Vintage Manta Ray customisation quest 12 years 5 months ago #4169

  • Edou
  • Edou's Avatar Topic Author
  • Offline
  • Hopping Mad
  • Hopping Mad
  • Posts: 6135
  • Likes received: 483
Also got all new Top Force suspension arms and a bumper coming this way! :cheer:


Put quite some time in restoring the arms that are on the car now but they are still too old and damaged for my liking... :whistle:
And fitting a brand new TF bumper is just cool.
Attachments:

Please Log in to join the conversation.

Last edit: by Edou.

Vintage Manta Ray customisation quest 12 years 5 months ago #4172

  • Edou
  • Edou's Avatar Topic Author
  • Offline
  • Hopping Mad
  • Hopping Mad
  • Posts: 6135
  • Likes received: 483
Since the discovery of the Thundershot dogbones in the British parts lot, I now frequently type a search for the car.
Don't ask why... I really don't know. :huh:
Apart from the fact that I found this at $6 (a bit of a steal I think) because of that :


Conveniently being able to combine some other small parts for shipment with it.
I'll put these on the Manta Ray and replace some of the dogbones with the plastic (Manta Ray) joints on the Humvee. :cheer:
I like these items a lot - a very nice upgrade over the basic parts :


And I guess I've always been writing Thundershot wrong - it clearly says "Thunder Shot" on the package. :whistle:

Please Log in to join the conversation.

Last edit: by Edou.

Vintage Manta Ray customisation quest 12 years 5 months ago #4204

  • Edou
  • Edou's Avatar Topic Author
  • Offline
  • Hopping Mad
  • Hopping Mad
  • Posts: 6135
  • Likes received: 483
This has kind of become a megathread...
When the final upgrades have been fitted (which is hopefully soon) I will therefore try to create a good summary, parts list with numbers and an overview of useful links. And update the index in the first post accordingly.

Of course I'm still researching parts. Which makes it very tempting to bring the Manta Ray up to TF Evo spec even more...
The purpose was never to build a Top Force though... just a very hopped up Manta ray.
But I will add the info of the differences between these models also - for the sake of thoroughness.

More updates soon...

Please Log in to join the conversation.

Vintage Manta Ray customisation quest 12 years 5 months ago #4224

  • Edou
  • Edou's Avatar Topic Author
  • Offline
  • Hopping Mad
  • Hopping Mad
  • Posts: 6135
  • Likes received: 483
While waiting on parts, I decided to check the solidity of the build so far.
A couple of things that are not in order... :huh:

First thing to be noticed is that the rear shock tower seemed to be a bit loose.
The cause of this was quite obvious - the regular 10mm tapping screws just don't do the job.
A couple of 15mm replacements (the small circles) solved this problem :


The rear gearbox has a few known weak spots. These attachments for the shock tower for example.
So putting in some longer screws is a good idea in any case.
Another beneficial modification would be to use a small connection plate and connect both ends of the screws that are coming out of the rear - using regular threaded screws in that case.
Or a bit simpler option would be just to put some small nuts on them.

This side of the gearbox is only held down by the 10mm screw in the larger circle.
A small plate (or big ring) in between to divide the pressure here will prevent the top gearbox cover from ever lifting up...
That might happen when there is too much force on the idler gear underneath.

The ball diff that I put in it didn't function right either. :S
Turning the rear wheels in the same direction gave no propulsion to the main drive shaft at all.
So there was no pressure on the bolt inside the diff. :dry:

It took me quite a while to figure out what was wrong - I just couldn't get the tension bolt in properly.
Turned out the threads in the pressure plate were damaged and I had to tap it again.
Works fine now. Coming close to a testrun... :)

Please Log in to join the conversation.

Last edit: by Edou.

Vintage Manta Ray customisation quest 12 years 5 months ago #4235

  • Edou
  • Edou's Avatar Topic Author
  • Offline
  • Hopping Mad
  • Hopping Mad
  • Posts: 6135
  • Likes received: 483
Wish I saw the mailman more often! :cry:
Oh well... see what else can be done on the cars.

For example that FRP upperdeck! And so I started working on that...
What it needed most wasn't a replacement - but some more effort in sanding and polishing.
That actually (unexpectedly) got rid of the white haziness that was still present :


Now the whole chassis will appear a lot slicker - the upperdeck is more or less the eye catcher.
Even with the flash from the camera it's looking pretty tight. B)

Next on the list is to put this alloy servo arm (for a high torque servo saver) on :


It is still on the other (Humvee) chassis but that will need a servo arm that's as short as possible...
Still need to work on the maximum steering angle on that car.
Too bad 3Racing doesn't produce this item in silver though.

Please Log in to join the conversation.

Last edit: by Edou.

Vintage Manta Ray customisation quest 12 years 5 months ago #4243

  • Edou
  • Edou's Avatar Topic Author
  • Offline
  • Hopping Mad
  • Hopping Mad
  • Posts: 6135
  • Likes received: 483
Posting in this topic like it's a Twitter account. :whistle:
Getting closer and closer to a finished car...

I did the switcheroo on the servo arms - sorry about the quality of the pics this time.
On the left the servo that was in the Humvee - on it a 3Racing blue alloy servo horn.
This is the single hole 16mm short version (normally 18.5mm) and it will go on the metal geared servo of the M-Ray. B)
For the Hummer I will be using the shortest possible servo horn... on the bottom of the picture :


The center to center of the right one is about 13mm. Using that one in an attempt to limit the maximum steering angle :


I have used a 5mm ball end on it which barely leaves enough space to put on a ball adjuster that can move freely.
Having enough high torque servo saver parts, I might change that to a 4mm setup.
And a finished switcheroo :


Adding a nice detail to the chassis :


Btw, if you're wondering what's with all the shrink tube on the servo wires - the Robbe used to have an MPX connector and on the GWS I did a polarity reversion... twice. :huh:

Please Log in to join the conversation.

Last edit: by Edou.

Vintage Manta Ray customisation quest 12 years 5 months ago #4285

  • Edou
  • Edou's Avatar Topic Author
  • Offline
  • Hopping Mad
  • Hopping Mad
  • Posts: 6135
  • Likes received: 483
Who knows who Sinterklaas is? Well the postman has finally been playing him today! :cheer:
Got some really cool parts in. A ball diff for the front gearbox and some new Top Force Evo arms and dito bumper. B)


The diff set came at a really good price (a little less than 13 euro incl shipping!) and arrived in little over a week.
Pleasantly surprised by the store - Banzai Hobby which is in Japan. Paid by PayPal in Yen. :pinch:
Even turned out they communicate very well and offer some great service.
Reason to be plugging them again in my review topic soon...

And some original Evo parts for the car... how cool is that? :)
Got a very good deal on them from Gary .

Reason to build again. Still waiting on the one piece bearing for the differential. :silly:

Please Log in to join the conversation.

Last edit: by Edou.

Vintage Manta Ray customisation quest 12 years 5 months ago #4287

Who knows who Sinterklaas is? ...


Didn't he invent the process of diffusion bonding metal powders by heating to just below their melting point, thus creating better brake pads? ;)

Please Log in to join the conversation.

Moderators: caprinutstingray-63AndyAus
Time to create page: 0.237 seconds
Cookies are required to make this site work. If you continue to use this site you permit us to use cookies.