Keyword

TOPIC:

Vintage Manta Ray customisation quest 12 years 10 months ago #1372

  • Edou
  • Edou's Avatar Topic Author
  • Offline
  • Hopping Mad
  • Hopping Mad
  • Posts: 6135
  • Likes received: 483

Due to budgetary restrictions, I've had to resell the two rare items on the left. :(
Already had a lot of alternative parts coming in :


The torque splitter I'm keeping though. :)

Altogether it has now become a true mountain of hop ups :


So new progress on the chassis will now be shown again!
In fact I have alraedy started. First of all with taking apart a new looking vintage front gear box that I still had.
When I opened it up, I found a nice surprise :


A vintage ball diff. Just the thing I could use very well! :cheer:
Notice in the second picture that I already ordered a pair of diff joints just in case I got a hold of an extra ball diff!

The rebuild of the front is (apart from the shocks) now finished :


Looking very slick... B)

Please Log in to join the conversation.

Last edit: by Edou.

Vintage Manta Ray customisation quest 12 years 10 months ago #1373

Wow nice, I was already wondering when you would continue the build.
Looking great.
3 Old Tamiya's

Please Log in to join the conversation.

Vintage Manta Ray customisation quest 12 years 10 months ago #1381

  • Edou
  • Edou's Avatar Topic Author
  • Offline
  • Hopping Mad
  • Hopping Mad
  • Posts: 6135
  • Likes received: 483
Thanks, I was actually mostly waiting on deliveries that would make it possible to attach all the parts to the chassis.
I ordered the first option I selected for that about two months ago! And they arrived this week... :S

I've been making some new progress too. A bit of interesting customization.
The text I'll supply later but here are some pics :


:woohoo:

Actually - for the whole colour balance of it, I should put a black pin through the steering assembly... :whistle:

Edit : and that is why some black king pins are now on their way. This will make the chassis a tiny bit TA04... :blink:

Please Log in to join the conversation.

Last edit: by Edou.

Vintage Manta Ray customisation quest 12 years 10 months ago #1436

  • Edou
  • Edou's Avatar Topic Author
  • Offline
  • Hopping Mad
  • Hopping Mad
  • Posts: 6135
  • Likes received: 483
The first chassis is now finished! Hopped up all in blue alloy and carbon :


Actually - it will get some new titanium turnbuckles but that will look about the same...
More details I will (again) post later. :whistle:

Edit : and that is why some black king pins are now on their way. This will make the chassis a tiny bit TA04... :blink:

These king pins will not fit but for now a silver alloy one will do. :cheer:

Please Log in to join the conversation.

Last edit: by Edou.

Vintage Manta Ray customisation quest 12 years 10 months ago #1482

  • Edou
  • Edou's Avatar Topic Author
  • Offline
  • Hopping Mad
  • Hopping Mad
  • Posts: 6135
  • Likes received: 483
And like I said before, here is a (short) more detailed description of the build.
I was quite far already but there were still many hop ups to be added.
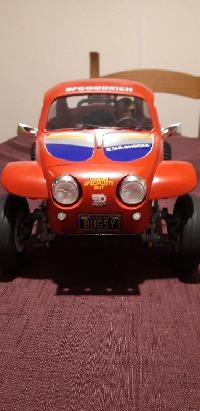
This is the state the car was in before I started fitting these :


I took every single thing you see here apart again! :huh:
Had a new chassis and gearboxes for it as well as all the new hop ups that needed to be fitted.
That way the Manta Ray could get it's original (vintage) chassis parts back.


The only thing that is officially vintage here is the gearbox on the left.
It belonged to a Manta Ray that was shipped from the UK and it already had some original upgrades.
To my surprise I found a nice ball diff when I opened it :


When I (carefully) disassembled this, I noticed two small pieces were missing :


For the ring I had no substitute (yet) but the missing ball could be replaced by a spare from the NIP I had for the next build.
This diff will be placed in the rear gearbox...

As you can see on the next picture, I went a little overboard with the cera-grease last time :


Nothing wrong with recycling this since the gearbox was hardly used after I put it together last time.
Just greasing the gears with a small brush will do this time. No use for an overdose :


Putting in the gears was done in a couple of seconds.
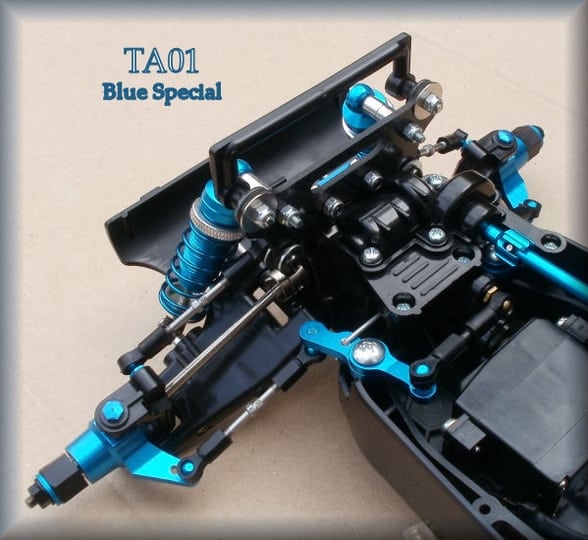
Next is to fit the new carbon shock tower, turnbuckles and other hop ups.


Showing progress! Same approach for the rear gearbox...

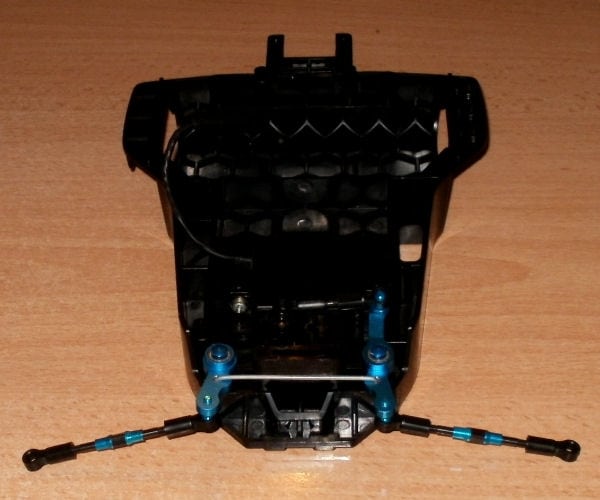
And then - a custom fit for the blue steering assembly.
These aftermarket parts are actually not suited for a regular bathtub chassis but are meant for a carbon or frp double deck.

This meant putting a drill into a brand new (rere) chassis! :whistle:
I had to enlarge the hole for fitting it from 2 to 3mm so I would be able to tighten it with a 4mm king pin that fit exactly through the 850 bearing. Also replaced the nylon bushings that came with it for some nice rubber sealed ball bearings :


Last step - put it all back together again and make another small adjustment.
Normally with a Manta Ray chassis you would put the ball ends (for steering) on the underside of the front upright :


Because this build has a higher stance, I switched to putting this on the top side of the knuckle.
This will give the steering a lot less friction...

And once more the end result :


Final adjustments (wheel directions) are still taking some time but this chassis can be considered finished.

Then it's up to the next build - the MR2K11! B)

Which is the code name for the vintage Manta Ray with modern feel and looks...
That is coming up soon - together with some more hop up mania! :woohoo:

Please Log in to join the conversation.

Last edit: by Edou.

Vintage Manta Ray customisation quest 12 years 10 months ago #1483

Mate, that looks awesome! B)

Is it destined to a life on the shelf, or will it be getting dirty? :evil:

Please Log in to join the conversation.

Vintage Manta Ray customisation quest 12 years 10 months ago #1484

  • Edou
  • Edou's Avatar Topic Author
  • Offline
  • Hopping Mad
  • Hopping Mad
  • Posts: 6135
  • Likes received: 483
I think it will be getting down and dirty! :laugh:

Reckon it will drive very nicely so I wouldn't wanna miss out on that...
Of course I can always clean and (partly) rebuild it again.
By now I can almost dream this chassis so that won't be much of a problem. :silly:

I have to admit it wouldn't look bad on a shelf either.
But it was made to hit the road big time!

I'll post a video demonstration of that soon. :)

Please Log in to join the conversation.

Last edit: by Edou.

Vintage Manta Ray customisation quest 12 years 10 months ago #1485

Good stuff mate - that's what I like to hear! ;)

Please Log in to join the conversation.

Vintage Manta Ray customisation quest 12 years 10 months ago #1486

wow that must have cost a pretty penny judging by all those hop-ups but its the best manta ray i have ever seen by a long shot and it just looks so good it was worth every penny. thats gotta be a shelfer its just too good to get dirty and its just too nice to look at.:woohoo:

this has been a great thread to follow keep up your work and keep posting about it and thanks for sharing the pics.:)

Please Log in to join the conversation.

Last edit: by tamiya nut.

Vintage Manta Ray customisation quest 12 years 10 months ago #1487

Looking good, the blue makes it look a lot more upto date and yet it still remains a classic.
What's the shell like you will be running on it?

It will be a shame to get dirty but it will be good to see how it handels :woohoo:

GING

Please Log in to join the conversation.

Last edit: by GingerSpice. Reason: spelling Doh!!!
Moderators: caprinutstingray-63AndyAus
Time to create page: 0.166 seconds
Cookies are required to make this site work. If you continue to use this site you permit us to use cookies.