About some detours, and oddly enough he came into my possession, the search for parts was partly right difficult, but now it can begin.
Of the overwhole condition of is consistently as well to describe, the car is completely, a servo and even the original mechanical speed controllers are installed.
Of course waited many scratches the underbody, and also the body has one or the other scratches/cracks.
Even the most defective or missing driver is present
The Chassie could be further stripped
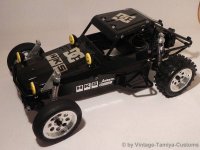
The cage is (for the time) sensational has been implemented, and seemed very Scalig
See also the shock absorbers as the originals of 1985 from
A look at the details of the front axle
The Chassie would undergo an intensive cleaning, only using detergent and then were still existing adhesive that remains with Spiritus away.
When cleaning was then unfortunately not all to a small crack in the Chassie found. The vitreous was cleaned, and so good it was glued to shock. Since the Chassie else a couple scratches has, i think i need to think about something else here.
The cage was also thoroughly cleaned, also here are of course clear narrowly missing in the plastic had been present
Consequently, it was pre-ground, smoothed over and finally primed
This was followed by three layers gloss black
During the drying of the cage's, were the two aluminum ribs. (the serve to reinforce) polished
In the interplay between the parts, a very smart thing as i think
The dampers were also cut ...
... And of course once again cleaned and polished. Here again the comparison to the left of the "only" purified dampers, to the right of the purified and polished dampers
After the Chassie again was produced/restored it could go further
The holder with their new battery compartment cover were mounted
After the front Damper stay were cleaned and refreshed you were assembled
The front axle has been cleaned, refurbished and somewhat straightened
Also the mounting were cleaned
Once again everything was mounted
The GFK reinforcement of the front axle was cleaned and primed
Then, as well as black painted and assembled
It then continued on the rear axle
Now it was time to mount the cage
The front axle has been further stocked
The first finished dampers could be mounted on the front axle
Then it went to the gearbox
Everything has been disassembled, cleaned and then again with ball bearings and stocked with V2A mounted and screwed
Now it was time again inculcate the transmission
The parts of the power transmission have been purified, with new ball bearings stocked and mounted
The bracket were also revived and mounted
In order to avert the engine the it was something i've been trying, until i wanted a nice brushed motor, am now but because of the optics but with a nice brushless motor landed
All red plastic parts were cleaned
After the cleaning was then wrapped everything in shiny black and after and after mounted on the model, just as the first finished rear dampers
The second shock absorbers of the front axle was ready ...
...And, after the glands were grown reconsindered
In my parts boxes I am still on a new eco II Servo encountered towering above which in the time of the Wild one fits and immediately was mounted
The original front tires were cleaned, refurbished and then click on the new aluminum rims are reared and fitted with ball bearings
The new rear tires were also drawn on aluminum rims
Then, the new rims time sample sit at the model
The first decals were in the assembly of the second rear shock absorber appropriate
The engine was also enhanced by Decal
The new body was as the next in the series
After the cutting and drilling the holes, it is expected to Seat tests
According to the orders of the black Lexan paint was first mounted the roof ...
... Then the Chassie disguise
After the body has now taken place had the chrome sticker affixed were
In the port went there to the manufacture of lamps, the output parts tree was disconnected
The lamp coverings were painted yellow and with the then typical Daxlighter smileys fitted
The housing were painted black
Then followed the assembly


")
")
") I hope it is ok?
I hope it is ok?