Keyword

TOPIC:

Vintage Manta Ray customisation quest 12 years 6 months ago #3369

Looks very well stuck down :)

Please Log in to join the conversation.

Vintage Manta Ray customisation quest 12 years 6 months ago #3379

  • Edou
  • Edou's Avatar Topic Author
  • Offline
  • Hopping Mad
  • Hopping Mad
  • Posts: 6135
  • Likes received: 483
I can only say it handles like a dream. Especially on tarmac.
It evens out the sharp corners beautifully with the shocks and long arms.
Can even put on a bit more tension on for on road use since they're adjustable. B)
That'll save me some tears over doing damage on the vulnerable body. Nothing like lexan when it comes to flexibility.
The jump at around 20 sec in the video shows it sticks real nice. :)

This terrain was pretty tough and the tyres not that great.
When I get the Dirt Hawgs to fit right, that should make all the difference.
Gonna use this chassis as a runner from now. Probably with the Cayenne shell.
Still - it's a Manta Ray for the most part. :huh:

Edit - moved the video to this page :

Please Log in to join the conversation.

Last edit: by Edou.

Vintage Manta Ray customisation quest 12 years 6 months ago #3417

  • Edou
  • Edou's Avatar Topic Author
  • Offline
  • Hopping Mad
  • Hopping Mad
  • Posts: 6135
  • Likes received: 483
Not a bad on road top speed either. B)


Now I really need to adjust the newly built ball diff...

Please Log in to join the conversation.

Last edit: by Edou.

Vintage Manta Ray customisation quest 12 years 6 months ago #3425

That's fast...B)

Please Log in to join the conversation.

Vintage Manta Ray customisation quest 12 years 6 months ago #3429

  • Edou
  • Edou's Avatar Topic Author
  • Offline
  • Hopping Mad
  • Hopping Mad
  • Posts: 6135
  • Likes received: 483
This car has managed to surprise me a few times.... :huh:
What an awesome chassis - over 20 years old!

It kind of makes me want to get a new (58495) TA02T F-150 Baja.
Would love to have one of those also - with a carbon chassis and some hop ups... :silly:

Please Log in to join the conversation.

Last edit: by Edou.

Vintage Manta Ray customisation quest 12 years 6 months ago #3430

  • Edou
  • Edou's Avatar Topic Author
  • Offline
  • Hopping Mad
  • Hopping Mad
  • Posts: 6135
  • Likes received: 483
The new alloy (slightly shorter) servo horn looks pretty slick. B)
Perfect match with the high torque servo saver from the same brand I just installed...


Please Log in to join the conversation.

Last edit: by Edou.

Vintage Manta Ray customisation quest 12 years 6 months ago #3537

  • Edou
  • Edou's Avatar Topic Author
  • Offline
  • Hopping Mad
  • Hopping Mad
  • Posts: 6135
  • Likes received: 483
Readjusting the ball diff on these gearboxes really is a 2-minute fix. B)
So the Hummer is once again ready to go. When it will finally stop raining...

I have some new supplies at home to do a bit of custom modding on the "blue" chassis.
First of all a metal sheet to make an underguard for the plastic bathtub - a piece of zinc with 0.5mm thickness.
One off road trip clearly showed the softness of the underside.
Quite up to spec with the 1:1 to provide some extra armour. :dry:
I will need new tools for that though...
Also have some new resin to do the fiber glass reinforcing where I dremeled to make room for the alloy steering.


But that will be done after I finish the FRP set up... soon! :ohmy:

Please Log in to join the conversation.

Last edit: by Edou.

Vintage Manta Ray customisation quest 12 years 5 months ago #3917

  • Edou
  • Edou's Avatar Topic Author
  • Offline
  • Hopping Mad
  • Hopping Mad
  • Posts: 6135
  • Likes received: 483
Why no progress on the Manta Ray for a while? I kind of want another ball diff to put in the front gearbox. :whistle:
That would fit the build so much better...

I did get a weapon of choice to create an underguard for the other chassis though - some affordable metal scissors :


Some of Jonny's skills would come in very handy at this point... :pinch:

Edit : much too crude and fiddly with this tool - next approach will better be with a saw.

Please Log in to join the conversation.

Last edit: by Edou.

Vintage Manta Ray customisation quest 12 years 5 months ago #4064

  • Edou
  • Edou's Avatar Topic Author
  • Offline
  • Hopping Mad
  • Hopping Mad
  • Posts: 6135
  • Likes received: 483
No more delay! But some real progress... :cheer:
I have put in a gear diff for now and finished building the complete front gearbox.
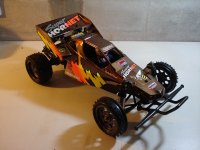
Still many pics of the details to sort out but here's a sneak peek :


List of upgrades :

- Ball bearings
- Hollow carbon gear shaft
- GPM silver alloy prop joint (for the main drive shaft)
- Aluminium shock tower
- Refurbished dampers with new Top Force housings
- 3Racing titanium turnbuckles for camber adjustment
- Thundershot hardened dogbones
- GPM silver alloy uprights
- Lightweight kingpins
- Aluminium 12mm hexes (a bit too blue I think)
- TRF ball ends and such...

Still available hop up is a torque splitter set. Got a NIP. B)
But the combination of a gear diff and a hollow carbon shaft for the bevel gear is a nice setup too.
Looking a the price of a NIP 53071 and it's actual functionality, I'll stick with the parts I've fitted for now...

Much more to come...
Attachments:

Please Log in to join the conversation.

Last edit: by Edou.

Vintage Manta Ray customisation quest 12 years 5 months ago #4065

...
I did get a weapon of choice to create an underguard for the other chassis though - some affordable metal scissors :
...
Edit : much too crude and fiddly with this tool - next approach will better be with a saw.


I missed this post - was "affordable" the same as "cheap"? :whistle: I don't see any sort of brand on them, my experience of cheap Aviation Snips is that instead of cutting, they often wrench your wrist round 90 degrees & bend what you were trying to cut... I also noticed that you bought a set of "right cut" snips, which is fine if you're cutting in that direction, but straight cut snips go both ways ...

I wonder if you were also being a bit ambitious - what material was the underguard, and how thick was it? I know some snips make bold claims such as "cuts 18 guage (1.02mm) steel" ... I wouldn't go any thicker than 0.75mm annealed aluminium or copper, 1.5mm, maybe 2mm styrene with them though ...

Please Log in to join the conversation.

Moderators: caprinutstingray-63AndyAus
Time to create page: 0.156 seconds
Cookies are required to make this site work. If you continue to use this site you permit us to use cookies.