TOPIC:
My Wild Willy/Willy's Wheeler/Honda City Turbo Builds 11 years 4 weeks ago #20652
|
|
|
Please Log in to join the conversation. |
My Wild Willy/Willy's Wheeler/Honda City Turbo Builds 11 years 3 weeks ago #20705
|
Still failing to put this one back in the cupboard
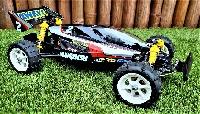
Bumper & holder have been filled & rubbed down so are ready for primer/paint/clear - so it doesn't matter so much that I completely forgot about painting the roof spoiler Tackled the badly/incorrectly painted lights with Tamiya X-20A Acyrlic Thinner & cotton buds (q-tips) ... they should have been clear oarange, clear red & nothing, but were pale pink, red & orange... the pink had badly etched the plastic Painted body details & put a few of the home made decals on ... like the Pajero wheelie, I think this looks pretty good in plain white ... ... but I pressed on with the blue vinyl ... this is yet another car where Tamiya have the decal edges in boneheaded places - all the top pieces on the spats (wheelarch extensions) peel & look tatty very quickly, so I held them down with a bit of extra clear ... |
|
Please Log in to join the conversation. |
My Wild Willy/Willy's Wheeler/Honda City Turbo Builds 11 years 3 weeks ago #20706
|
Holding off on doing the other colour as I still haven't decided...
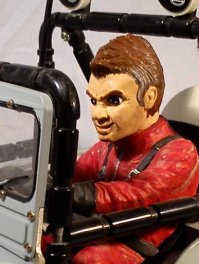
Red has to be 1st choice - it's boxart & anything else does hurt value (not that I'm likely to be selling this one on) ... ... although "official" alternatives won't hurt too bad, so I am entertaining yellow... Sky Blue is beginning to look quite good too... ... but Park green , not so much. I've discounted the pink option, even if it is a dark pink/light red I've also painted the big M38 greeblies, old Willy figure was marked with a "V" on the back during painting so I can tell which is which. |
|
Please Log in to join the conversation. |
My Wild Willy/Willy's Wheeler/Honda City Turbo Builds 11 years 3 weeks ago #20710
|
There is so much nice work in this topic, that I don't know where to begin!
Really good work, JR, I'm looking forward to the end result Signature now gets correct formatting if you edit it in your Profile. Use normal BBcode if you want.
www.tamiyabase.com was formatted automatically. |
|
|
Please Log in to join the conversation. |
My Wild Willy/Willy's Wheeler/Honda City Turbo Builds 11 years 3 weeks ago #20715
|
Thanks chaps - I think it's working out quite well, though not that quickly - if I hadn't kidded myself that I was just going to check what bits it needed then put it away, I might have gone about it more methodically...
Anyway, although the helmets worked put quite well, I really wanted to do a bit more testing before committing myself to yellow, so fiddled with the boxart pic ... I cn't do anything with the red windscreen strip surrounds, but I think that came out nicely.. |
|
Please Log in to join the conversation. |
My Wild Willy/Willy's Wheeler/Honda City Turbo Builds 11 years 3 weeks ago #20717
|
|
|
Please Log in to join the conversation. |
My Wild Willy/Willy's Wheeler/Honda City Turbo Builds 11 years 3 weeks ago #20719
|
Due to the number of fasteners missing, chewed up or destroyed in disassembly, I'm going to rebuild with (mostly) stainless fasteners ... the list is pretty much as per the Wild Willy:
Screw Bag "A": a2 (4mmx8 round head screw) - replace with 9 off M4x8mm cap head machine screws a3 (5mm grub screw) - replace with 4 off M5x5mm grub screws a4 (4mm washer) replace with 4 off M4 washers a6 (4mm spring washer) - replace with 4 off M4 spring washers a7 (3mm spring washer) - replace with 4 off M3 spring washers Screw Bag "B": b2 (3mmx8 aluminium countersunk) - replace with 2 off M3x8mm countersunk screws b3 (3mmx15 round head) - replace with 3 off M3x15mm cap head machine screws b4 (3mmx4 round head) - replace with 2 off M3x4mm button head screws b6 (3mm grub screw) - replace with 2 off M3x3mm grub screws b7 (3mm washer) - replace with 4 off M3 plain washers Screw Bag "C": c1 (2x15mm round head screw) - replace with 1 off M2x15mm cap head screws c2 (2mmx10 round head screw) - replace with 5 off M2x10mm button head screws and 6 off M2x10 cap head screws c3 (2mmx6 round head screw) - replace with 14 off M2x6mm button head screws and 2 off M2x6mm cap head screws c4 (4mm self tapper for front wheels) - use original self tappers or replace with 2 off M4x8mm cap head screws c5 (4mm flanged nut) - replace with 4 off M4 flange nuts c6 (3mm flanged nut) - replace with 7 off M3 flange nuts Screw Bag "D": d1 (3mmx10 round head screw) - replace with 7 off M3x10 cap head screws and 10 off M3x10 button head screws d2 (3mmx6 round head screw) - replace with 16 off M3x6 button head screws and 7 off M3x6mm cap head screws d3 (3mm nut) - replace with 8 off M3 full nuts and retain 1/2 height nut from helmet d4 (2mm washer) - replace with 2 off M2 plain washers d5 (2mm nut) - replace with 10 off M2 full nuts Other bits: e1 (2mm roll pin) - replace with 2 off 2mmx12mm roll pins n8 (3mmx60 countersunk screw) - these are impossible to replace, so retain originals where possible. 1 is used in motor pod & _must_ be countersunk, other 2 are used as rear suspension struts & could be replaced with anything the right size & long enough - but the best I've found so far are M3x60mm cheese head BZP screws n9 (4mmx70 round head screw) - these hold the front end tubes together, they are generally fine but can be replaced with 3 off M4x70mm cap head machine screws You may also need fittings for the rx switch, typically 2 off M2x10 cap head screws, 2 off M2 plain washers, and 2 off M2 full nuts
The following user(s) Liked this: waterbok
|
|
Please Log in to join the conversation. |
Time to create page: 0.441 seconds


