Keyword

TOPIC:

Hornet restoration 11 years 9 months ago #11009

this arrived this morning through the post :D, dosent look to bad at a glance, came with old acoms transmitter, and charger, a 12v car charger (!)and the old humpback tamiya battery.


sadly not as good close up....


body is tatty but can probably be tidied, id replace it but sadly the new tamiya decals dont have the proper sponsor logos...... worst part is the fixing for the rear wing where the screws have pulled through, should be able to fix it tho (and better then the hot glue holding it on atm) and then tidy it up not so concerned but kind of want to keep it original


btw is there supposed to be a front windscreen? i cant remember what my last one had

tyres have seen better days.....


The chassis is cracked round the strut top and has been glued at the front with araldite or something, not pretty but seems strong enough, although new replacements aren't expensive so i may just replace it, not sure yet.


My plan for it is to keep it standard and use as many original parts as i can, will probably fit a modern receiver and an electronic speed controller though (will keep the resistor for looks), will tidy up the body leaving the original stickers etc (unless i find a good set of repro decals)

Please Log in to join the conversation.

Last edit: by Ratchet.

Re: Hornet restoration 11 years 9 months ago #11011

Should be fun to restore. Iconic car. :)
No windows on the vintage car , but the reissue has a lexan shell so that's a closed version.
Finding good repro decals won't be easy these days.
Best thing would probably be to find a good scan and make your own...
I'll follow your build and may have some parts if you need them. :y:

Please Log in to join the conversation.

Last edit: by Edou.

Re: Hornet restoration 11 years 9 months ago #11015

Should be fun to restore. Iconic car. :)
No windows on the vintage car , but the reissue has a lexan shell so that's a closed version.
Finding good repro decals won't be easy these days.
Best thing would probably be to find a good scan and make your own...
I'll follow your build and may have some parts if you need them. :y:


thanks :D yeah the hornet was always the car i wanted as a kid (before other models came out...) was pretty much the first tamiya kit i saw too, in a early 80's hamleys (london toy store) catalog

Interesting, the shell on this car is lexan, but its definitely an original? if i remember correctly the one i briefly owned before was the same (i may be wrong)

Parts will be handy, short of funds right now sadly but i will be needing bits, a set of tyres (and wheels possibly) is onething i need, interestingly enough it seems like mine has had frog rear tyres fitted at soem point in its life as there the paddle type, there well beyond any salvage attempt though, and the fronts are worse.... one has split all the way round, the other has a bite(!!) taken out of it

Please Log in to join the conversation.

Last edit: by Ratchet.

Re: Hornet restoration 11 years 9 months ago #11017

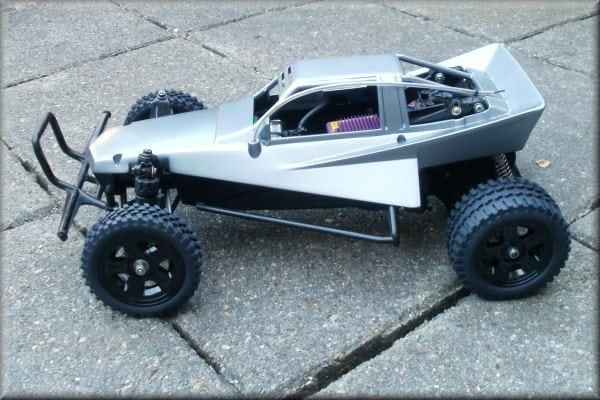
Some more pictures of the shell and chassis before i start taking it apart.

I tried the battery which i got with the car after an hour or two of charging, the motor seems to work, not sure if the battery is any good though, it had enough juce to turn the wheels but no more, have stuck it on charge overnight (didn't get any instructions etc with the acoms charger but i guess its a slow charger)

Speed controller is dodgy though as expected and most of the wiring and 'soldering' is shocking, has some weird fuse on the receiver too? not sure if thats original?


Paint is peeling off the shell, not sure what to do about that, not a priority right now, also the screw holes where the driver fits on and the rear wing are damaged, will have to do something about them.


The front of the chassis is the worst, it has been hacked about, possibly in a misguided attempt to correct the asymmetrical steering hornets have? seems the only reason i can think for it, maybe they thought the servo was hitting the chassis? hasn't helped predictably, having no affect other than weakening the chassis which has then cracked....

not sure if i should replace the chassis or repair, it im leaning towards replace as there cheap to buy, i know that it wont be original but at least it will be strong (and this will be a runner)


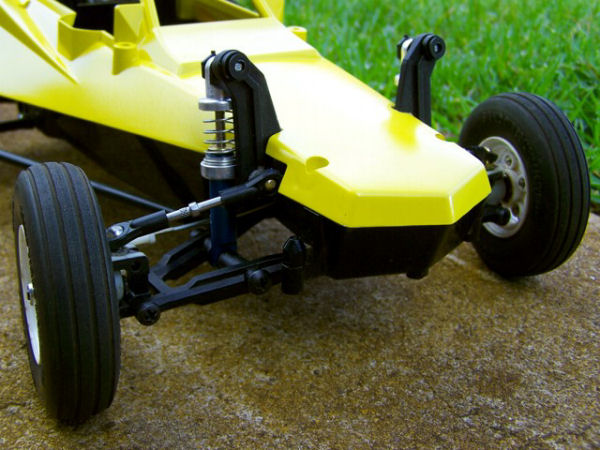
will dismantle the chassis and stick all the parts in a bucket to clean it as its pretty dirty... also make a list of bits i need

Please Log in to join the conversation.

Last edit: by Ratchet. Reason: sorting my horrendous spelling and punctuation

Re: Hornet restoration 11 years 9 months ago #11018

You could be right that the original shell is lexan as well.
Think I'm confusing it with my own first car, the Grasshopper.
Kinda wanted a Hornet. But especially a Hotshot later on.
I'll have a look in the manual what's what...

Still have that Hopper - I put some Frog hex adapters on it and a DT-02 tyre set :


:)

Please Log in to join the conversation.

Re: Hornet restoration 11 years 9 months ago #11019

Ah yeah same chassis as the hornet so maybe

When i had a hornet before a schoolmate of mine had most of a new grasshopper 2 kit, (no idea what happened to the rest of it, the guy was an idiot who got anything he wanted from his parents, he had had it for years but didn't/couldn't build it) which i was going to buy for spares, but he wanted far too much for it so sadly i gave up on that car, i did get the front wheels from it though, sadly dont have them anymore

Nice looking car :) looks good with the later wheels and tyres, what are those front shocks from? looks like a good upgrade.

Please Log in to join the conversation.

Last edit: by Ratchet.

Re: Hornet restoration 11 years 9 months ago #11022

The original shell is definitely lexan. That's what the TB database says... :lol:
Maybe the original manual states to cut out the window.

My Grasshopper has Super Hornet shocks (and suspension arms) on the front and Hornet aluminium dampers on the rear.
But it's in parts now, waiting on another rebuild.
I've learned a bit in the meantime to make it a better runner...

:)

Please Log in to join the conversation.

Re: Hornet restoration 11 years 9 months ago #11024

looks like it, it doesn't seem to say in the manual, but in all the pictures i see of originals have the front window cut out so must have been correct for it, guess the side ones were left in as otherwise there would be no strength in the roof?

Might do that suspension mod on my one, if i can track down some parts for it

will possibly do the third shock mod to the rear too, if i can find a shock that is short enough to fit a hornet

Please Log in to join the conversation.

Re: Hornet restoration 11 years 9 months ago #11026

Yeah, weird that there's nothing about it in the manual. Must be precut.
I'm pretty sure you can't form it like that...

Most awesome customization you could do on the front suspension is the CRP conversion.


Both that and the Super Hornet parts shouldn't be all too hard to find.
If I remember well, the suspension arms are shared with later models.
And the shocks just need to be about the right size...

The rigid axle rear suspension certainly is limited. Third shock mod should help a lot.
I was thinking about a fourth shock mod to get rid of the tiny springs altogether...
Hornet dampers may help a bit but next on my Hopper will be some Frog shocks.
They're the "official" racing mod listed.
Starting on that project will take a while though...

:side:
The following user(s) Liked this: Ratchet

Please Log in to join the conversation.

Re: Hornet restoration 11 years 9 months ago #11029

1st Hornet shell was lexan, "window or not" was down to whether or not you cut it out when trimming the shell.
Chassis - I've never seen one broken there, & wouldn't have thought it would be under a huge amount of stress, so was probably the result of a weird crash. If you've got a low wattage soldering iron with a clean tip, clean the araldite off & weld the crack together using the iron - it's far stronger than glue, but does tend to go a bit brittle (Should be ok as long as you don't crash it though). To do the repair with a soldering iron, run the tip side-on along the crack, to form a "root weld" (Do it inside & out), then use the flat of the tip to "sweep" molten plastic either side of the crack, into the "root" gouge to fill it in (If that makes sense). Try not to melt the plastic too much, as the longer you heat it, the more brittle the set joint will be.
Have another look at the fuse - it should be in the battery -ve wire to the speed control, NOT anything to do with the receiver....
Oversize holes in the wing can be fixed by making "penny washers" (Large washer, small hole) out of old coke bottle plastic (If you're not planning to buy a new shell yet).
1st job before you run the car though, change the servo saver spring for the thinner/weaker version (The white C-shaped collar on the steering servo. The weaker one hasn't got the raised central band). Also, make sure the central screw isn't too tight so the assembly can function properly. Be warned, those Acoms AS1s/2s are VERY prone to stripping gears, & if you don't weaken the servo saver, they WILL bite the dust sooner or later!.
Rear suspension wise, Everyone bangs on about how rubbish it is & how to add loads of extra bits to make it work better - don't bother, remove the "peg springs" & slotted front gearbox mounts & fit the non-sliding Grasshopper ones, it'll handle much better (My brother & I used to race them , he fitted the Hornet conversion & immediately went back to Grasshopper type mounts. My hopper was an A-finalist....).
What else... oh yeah, fit a ballrace kit, they're cheaper than replacing the counter gear & front stub axles, which will wear at a huge rate if you carry on using plain plastic or bronze bushes
The following user(s) Liked this: Ratchet

Please Log in to join the conversation.

Moderators: caprinutstingray-63AndyAus
Time to create page: 0.195 seconds
Cookies are required to make this site work. If you continue to use this site you permit us to use cookies.