Keyword

TOPIC:

Vintage Manta Ray customisation quest 10 years 9 months ago #23375

  • Edou
  • Edou's Avatar Topic Author
  • Offline
  • Hopping Mad
  • Hopping Mad
  • Posts: 6135
  • Likes received: 483
To make the mixed and matched screws, nuts and whatnot into more of an ensemble :


B)

Please Log in to join the conversation.

Vintage Manta Ray customisation quest 10 years 9 months ago #23435

  • Edou
  • Edou's Avatar Topic Author
  • Offline
  • Hopping Mad
  • Hopping Mad
  • Posts: 6135
  • Likes received: 483
That's all been fitted, pretty awesome. I'll take some pics later (before I get it all dirty again). :)

Also the red front uprights that were on it were pretty shot so that needed replacement :


I decided to go with a blue alloy upgrade :


B)


Knuckles came from RC Damper... and they are now the weakest link in the chain.
Bearing tolerance on them is quite horrible. I even start to think they're GPMs that didn't make the cut.
So that'll be something to change (once more) in the future (not throwing any more cash at it for a while).

Please Log in to join the conversation.

Last edit: by Edou.

Vintage Manta Ray customisation quest - facelift 10 years 9 months ago #23447

  • Edou
  • Edou's Avatar Topic Author
  • Offline
  • Hopping Mad
  • Hopping Mad
  • Posts: 6135
  • Likes received: 483
Before :


All new black chassis screws :


This was looking a bit messy :


Replaced all nuts with anodised alloy and just about all screws.
All the bits in the steering linkage as well - and added dust covers on the ball ends :


And some subtle aesthetic differences on the rear (just need some smaller rings) :


:)

Please Log in to join the conversation.

Last edit: by Edou.

Vintage Manta Ray customisation quest - facelift 10 years 9 months ago #23448

  • Edou
  • Edou's Avatar Topic Author
  • Offline
  • Hopping Mad
  • Hopping Mad
  • Posts: 6135
  • Likes received: 483
Front end was a mix and match :


Just a little nicer in every way (even the shock spacers) :


Fluorine ball ends, Tamiya king pins and dust covers for the steering, plus a black alloy nut for the servo horn :


King pins looked too shiny so I aged them a bit (fine sanding and caustic soda) :


Even the spacer is black now - and 0.5mm smaller to create some more room :


Left ball end was tightened after I saw this picture. :whistle:
No more blue on blue or golden ball ends :


Not too shabby, we're actually getting there after a year or three :


:cheer:

Please Log in to join the conversation.

Last edit: by Edou.

Vintage Manta Ray customisation quest - facelift 10 years 8 months ago #23505

are you going to run it? :huh:
if not WHY?!?!?!
if so YESS!!!!!!!!!! you need a vid

Please Log in to join the conversation.

Vintage Manta Ray customisation quest - facelift 10 years 8 months ago #23506

  • Edou
  • Edou's Avatar Topic Author
  • Offline
  • Hopping Mad
  • Hopping Mad
  • Posts: 6135
  • Likes received: 483
It had a moderately successful test run already. :)


Ready for the next. :cheer:

Please Log in to join the conversation.

Vintage Manta Ray customisation quest - facelift 10 years 8 months ago #23511

Nice one! No problem with sand with the open brushed motor and with the axialgrease?
The following user(s) Liked this: Edou

Please Log in to join the conversation.

Vintage Manta Ray customisation quest - facelift 10 years 8 months ago #23513

  • Edou
  • Edou's Avatar Topic Author
  • Offline
  • Hopping Mad
  • Hopping Mad
  • Posts: 6135
  • Likes received: 483
Definitely the most dirt gathered inside the wheel axles (dogbone side). :S
That's why I don't grease them to begin with...
Got a good clean with a brush altogether though. Shook out the rest (motor as well).

:silly:

Please Log in to join the conversation.

Vintage Manta Ray customisation quest - facelift 10 years 8 months ago #23576

  • Edou
  • Edou's Avatar Topic Author
  • Offline
  • Hopping Mad
  • Hopping Mad
  • Posts: 6135
  • Likes received: 483
So I'm sure everybody has read every single thing that happened during the past seventy pages. :lol:
Anyway, I started out with this Hummer using both 70mm shocks rear and front...
Then I thought they were a little long in front and wanted to try 65mm.
Yeah Racing didn't have those so I bought a complete 60mm shock set - and used only two of them :


Now when I wanted to put the remaining pair of 60-70mm up for sale, I realised I had been a rookie earlier in this thread!
I could have avoided getting the shorter set (although they matched pretty well) altogether and just space out the shaft by 5mm.
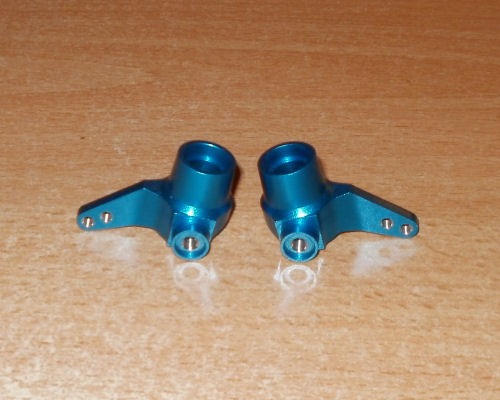
Which is what I will be doing this time around (and raise the suspension a little) :


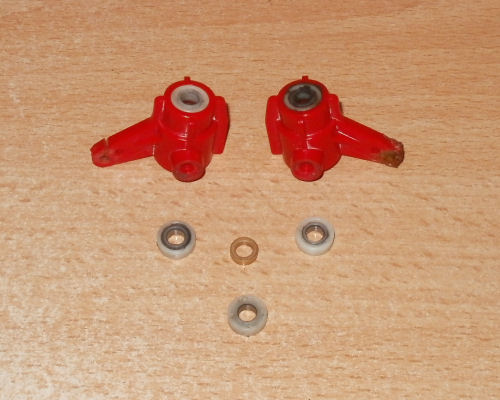
Recycled (slightly used and deanodised) parts....
Gonna add some TRF oil seals while I'm at it, since they are the same size.

:)

Please Log in to join the conversation.

Last edit: by Edou.

Re:Vintage Manta Ray customisation quest - facelift 10 years 8 months ago #23577

Uuh, very Hard setup for the Hard terrain. Use soft Oil and Soft setup

Please Log in to join the conversation.

Moderators: caprinutstingray-63AndyAus
Time to create page: 0.242 seconds
Cookies are required to make this site work. If you continue to use this site you permit us to use cookies.