AFAIK there's no real way of repairing splits in polycarbonate - the best you can hope for is to stop them getting worse by drilling/melting a small hole at the far end of the crack, reinforcing on the inside with reinforced aluminium tape & on the outside with a sticker.
Holes - the same idea really - use a bit of scrap lexan as infill the same size/shape as the hole, tape on the inside & sticker on the outside ... obviously you need to do this after any paintwork.
Paints - auto paint simply won't stick, and polycarbonate paints are meant to go on the inside, where the satin finish and/or brush marks don't show ... Tamiya PS sprays stick well and are dense, but have the usual satin finish, Tamiya PC paints will always leave brush marks, Faskolor brush/airbrush paints are very translucent (even the ones that are meant to be solid) ... Humbrol acrylic "Hobby Spray" is meant to stick to lexan - but I've found the results to be very variable - black & white are ok, midnight blue & orange fall off if you so much as fart in its general direction. It's also satin - even the ones that are meant to be gloss

In general then, lexan does need to go on from the inside, but that means you have to get the old stuff off. Thinners/Brake fluid will get it off, but will cloud & embrittle the polycarbonate, De-Solv-It Grafitti remover is _meant_ to be polycarbonate safe, but I've never tried it on lexan & there's a world of difference between quickly wiping off where some toerag has tagged your perspex-like shed window with auto paint, and getting off bonded on polycarbonate paint on the inside of a thin shell ... not sure I'd recommend it until I've seen someone else do it
")
Something you might not have considered, because it's counter-intuitive, is that you _can_ sand the inside of polycarbonate shells and still get a good result - because the paint will fill in the scratches & it's the top/outer surface that provides the shine anyway.
I remember trying this in the early 80's when Tamiya PC paint was the _only_ option for lexan shells - in the hope that "keying" the surface would make it stick better ... it didn't but the finish was as glossy as ever.
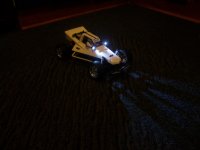
TBH that shell doesn't look too bad - If it were mine, I'd be inclined to reinforce the splits, polish up the outside & put some new stickers on it - perhaps some different colour stripes in self adhesive vinyl sheet?
")